Address
2949 Boundary Street
Jacksonville, FL 32202
Work Hours
Monday to Friday: 7AM - 7PM
Weekend: 10AM - 5PM
Address
2949 Boundary Street
Jacksonville, FL 32202
Work Hours
Monday to Friday: 7AM - 7PM
Weekend: 10AM - 5PM

You installed a tonneau cover expecting a dry truck bed, and now there’s a puddle next to your toolbox after every rainstorm. Frustrating? Absolutely. But before you blame the cover or the manufacturer, know this: the vast majority of tonneau cover leaks are fixable at home in under an hour with parts that cost less than $50. The issue is almost never a fundamentally flawed cover — it’s a maintenance problem, an installation oversight, or a misunderstanding about what tonneau covers are actually designed to do.
I hear this complaint more than any other from tonneau cover owners, and nine times out of ten, I can trace the leak to one of a handful of common causes. This guide walks through each one with the specific fix so you can get your bed dry again without replacing the entire cover.
Products are available — click below to view them!
SEE DETAILSTonneau cover leaks are most often caused by worn or compressed weather seals, clogged drain tubes, improper cover tension (on soft covers), misaligned panels (on hard covers), or clamps that have loosened since installation. Fixing these takes basic tools, replacement seals (usually $20–$40), and about 30–60 minutes. True waterproofing is not what tonneau covers provide — they’re weather-resistant, and understanding that distinction helps set realistic expectations.
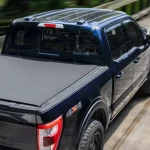
This is the first thing every tonneau cover owner needs to understand: tonneau covers are engineered to be weather-resistant, not waterproof. Even premium hard folding covers from BAKFlip and Extang, retractable covers from Retrax, and every other brand on the market are designed to manage water — redirect it, channel it, drain it — not to create a hermetic seal.
The reason is simple physics. A tonneau cover must open, close, fold, roll, or retract. Every moving joint, every hinge, every latch point is a potential water entry path. Manufacturers mitigate this with weather stripping, drain channels, and overlapping seals, but complete waterproofing would require the cover to be a single solid piece permanently bonded to the bed — which would defeat its entire purpose.
So when we talk about “fixing leaks,” we’re really talking about bringing water intrusion back down to the manufacturer’s intended level: minimal trace moisture that routes into the bed’s own drain system rather than pooling on your cargo. If you’re getting noticeable water inside the bed after rain, something has changed from the cover’s designed performance — and that’s what we’re fixing.
This is the number one reason tonneau covers start leaking after months or years of proper performance. The rubber or EPDM seals that line the cover’s perimeter and hinge points are under constant compression. Over time — especially through temperature extremes — they lose elasticity. The seal that once pressed firmly against the bed rail now has gaps where water sneaks through.
UV exposure accelerates seal degradation significantly. Rubber that’s baked by sun for two summers looks and performs differently from fresh material. It gets stiff, develops surface cracks, and loses the ability to compress and spring back. Coastal environments add salt air to the equation, which attacks rubber at a chemical level.
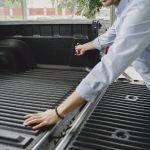
The fix: Inspect every seal on your cover — perimeter seals, hinge seals, tailgate seals, and any bulkhead seals at the cab end. Press each seal with your thumb. A healthy seal springs back immediately. A worn seal stays compressed or feels hard and inflexible. Replace any seals that show cracking, permanent compression, or hardening. Most brands sell seal replacement kits for $20–$40, and the installation is peel-and-stick on most models. If the manufacturer’s replacement seals aren’t available, automotive weather stripping from companies like Trim-Lok or Steele Rubber fits most covers with minor trimming.
As a preventive measure, apply silicone-based rubber conditioner to your seals every 3–4 months. This maintains elasticity and extends seal life significantly. Avoid petroleum-based products like Armor All — they shine the rubber temporarily but accelerate long-term degradation.
Most hard tonneau covers have integrated drainage systems — small channels and tubes that collect water entering at seal joints and route it out through drain tubes at the four corners of the bed. When these tubes work properly, water passes through the system and drips harmlessly below the truck. When they clog, water backs up and pools inside the bed.
Drain tubes clog with leaves, dirt, pollen, pine needles, and general road debris. If you park under trees regularly, your drain tubes are working harder and clogging faster than someone who parks in a garage. Some trucks also have bed liner material that partially blocks the drain tube openings — a common problem with aftermarket spray-in liners that weren’t applied with tonneau cover drain positions in mind.
The fix: Locate the drain tube openings — they’re typically at each corner of the cover frame, near the bed rail. Use a thin wire, compressed air, or a pipe cleaner to clear any blockages. Then flush each tube with a water bottle or hose to confirm flow. You should see water drip out from under the truck at the corresponding corner. If a tube is completely blocked and won’t clear with wire, you may need to remove the cover to access the drain channel directly. Add drain tube inspection to your monthly cover maintenance routine — 60 seconds of checking prevents hours of frustration.
Soft roll-up and soft tri-fold covers rely on fabric tension to create a taut surface that sheds water. When the tension is too loose, the fabric sags between the crossbars, creating low spots where water pools. These pools press the fabric down further, creating deeper pools — a self-reinforcing cycle that ends with a significant amount of water sitting on top of your cover and eventually seeping through the fabric or around the edges.
Tension can decrease over time as the fabric stretches, clamps settle, and crossbars shift. Temperature also plays a role — vinyl expands in heat and contracts in cold, so a cover that’s perfectly taut in spring may be loose during a hot summer afternoon.
The fix: Most soft covers have a tension adjustment mechanism — usually a tightening knob or bolt at the front or rear of the cover frame. Tighten incrementally until the cover surface is smooth and drum-tight with no visible sag between crossbars. If the tension adjuster is maxed out and the cover still sags, the fabric has likely stretched beyond its service life and needs replacement. Some brands sell replacement fabric without requiring a full new cover — check with the manufacturer before buying an entirely new unit.
Quick tension test: press the center of the cover with your palm. On a properly tensioned cover, the fabric should resist your hand with minimal deflection — maybe a quarter-inch. If it sags an inch or more under light hand pressure, it needs tightening.
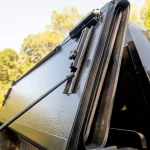
Hard folding covers depend on precise panel alignment for effective weather sealing. If a panel shifts even slightly — due to loose mounting hardware, a bent hinge, or thermal expansion — the gap between adjacent panels changes, and the hinge seal can’t bridge the difference. Water finds the gap and enters the bed.
Panel misalignment often happens gradually. Road vibration loosens mounting hardware over thousands of miles. Temperature cycling causes panels to expand and contract at slightly different rates if one panel is in direct sun while another is in the cab’s shadow. The result is a cover that sealed perfectly when installed but develops a slight gap at one hinge line over time.
The fix: Close the cover and examine each panel joint from the side, looking for uneven gaps. The gap between panels should be uniform along the full width of the bed. If one side is tighter than the other, the cover has shifted. Check the mounting clamps — if any have loosened, retighten them to spec. If the clamps are tight but the panels are still misaligned, check the hinge hardware for looseness. On covers with adjustable hinges (like many BAKFlip models), you can tweak the hinge position to bring panels back into alignment. The manufacturer’s installation guide usually includes a panel alignment procedure — revisit those instructions when addressing hinge-line leaks.
Your tonneau cover’s mounting clamps do more than hold the cover on the truck — they maintain the exact position that the cover needs to seal properly. When clamps loosen, the entire cover can shift forward, backward, or side-to-side by fractions of an inch. That shift changes the seal contact points along the bed rails, creating gaps where water enters.
Clamps loosen naturally over time from road vibration, especially on trucks that drive on rough roads or tow heavy trailers. The rubber pads between the clamp and rail also compress over time, allowing slight movement. This is normal and expected — it just requires periodic checking.
The fix: Check every mounting clamp for tightness. The cover should not shift at all when you push it forward, backward, or side-to-side with moderate hand pressure. If any clamp has loosened, retighten to the manufacturer’s spec. If the rubber pads are compressed or deteriorated, replace them. After retightening, close the cover and run a garden hose over it for several minutes, then check inside the bed for water entry points. This simulated rain test reveals whether the clamp adjustment solved the leak.
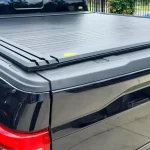
The junction between the tonneau cover and the tailgate is the most common leak point on virtually every cover design. The tailgate isn’t a perfect flat surface — it has handle mechanisms, lock assemblies, and stamped contours that create uneven sealing surfaces. The cover’s tailgate seal must bridge these imperfections, and it doesn’t always succeed perfectly.
On trucks with aftermarket tailgate accessories — backup cameras, handle covers, badges, or lighting — the sealing surface is even more irregular. Any accessory that changes the tailgate’s top edge profile affects how the cover seal contacts it.
The fix: Close the cover and examine the tailgate seal from outside the truck, looking for any visible gaps between the seal and the tailgate. If you find gaps, first check whether the tailgate is fully closed and latched — a tailgate that’s slightly ajar creates seal gaps. If the tailgate is properly closed, add supplemental foam seal tape to the gap areas. Self-adhesive EPDM foam tape (available at any hardware store for $5–$10) fills irregular gaps effectively. Apply it to the underside of the cover at the tailgate contact line, pressing firmly to ensure adhesion. You may need to trim and test a few times to get the right thickness — too thin and the gap persists, too thick and the cover won’t latch properly.
If your cover leaks at multiple points despite individual fixes, a full seal upgrade may be the most efficient solution. This involves replacing every seal on the cover — perimeter, hinge, tailgate, and bulkhead — in a single session. Order a complete seal kit from the manufacturer, or buy bulk EPDM weather stripping and cut to fit.
A full seal replacement takes 1–2 hours depending on the cover design. Remove the old seals completely, clean all contact surfaces with isopropyl alcohol to remove adhesive residue, and apply the new seals according to the manufacturer’s pattern. Let the adhesive cure for 24 hours before exposing the cover to rain. This essentially resets the cover to new-condition sealing performance and is far cheaper than buying a replacement cover.
If your cover frame is warped, panels are cracked, or the hinge mechanism has failed structurally, no amount of seal replacement will fix the leak. Structural damage creates gaps that seals can’t bridge. Signs that repair isn’t viable include: visible bowing in the cover frame, panels that won’t sit flat no matter how you adjust them, hinges with excessive play or broken components, and rails that have separated from the cover body. At that point, the cover has reached the end of its service life and replacement is the practical path forward.
It’s tempting but not recommended. Silicone caulk creates a permanent bond that prevents the cover from folding, retracting, or being removed properly. It also looks terrible and degrades the cover’s finish. Use proper automotive weather stripping and EPDM seals instead — they’re designed for the compression-and-release cycle that tonneau covers require and can be replaced cleanly when they wear out.
Not necessarily. New covers sometimes need an adjustment period — the seals need a few days of compression to conform to the bed rail profile. Give it a week of normal use before concluding there’s a problem. If leaking persists after the break-in period, recheck the installation against the manual — mispositioned clamps are the most common cause of out-of-box leaks. If everything is installed correctly and it still leaks, contact the manufacturer’s support team. Genuine manufacturing defects do occur and are covered under warranty.
A bed liner won’t fix the leak, but it can help manage the consequences. A spray-in bed liner creates a waterproof surface inside the bed, so any water that gets past the cover drains through the bed’s factory drain plugs rather than pooling against unprotected metal. The liner protects the bed from water damage, but the root cause of the leak still needs to be addressed at the cover level.
Generally yes. Hard covers have rigid panels that shed water more effectively and more robust seal systems. Soft covers rely on fabric tension to shed water and have simpler seals that wear faster. That said, a well-maintained soft cover can outperform a neglected hard cover. Maintenance matters more than cover type when it comes to long-term water management.
Run a garden hose test every 6 months — once before winter and once in spring. Close the cover, run a hose over the entire surface for 3–5 minutes, then open the cover and check for water inside the bed. This catches developing seal issues before they become problems during actual rainstorms. After any cover removal and reinstallation, repeat the test to confirm proper seal contact.


")