Address
2949 Boundary Street
Jacksonville, FL 32202
Work Hours
Monday to Friday: 7AM - 7PM
Weekend: 10AM - 5PM
Address
2949 Boundary Street
Jacksonville, FL 32202
Work Hours
Monday to Friday: 7AM - 7PM
Weekend: 10AM - 5PM
A tonneau cover sits on top of your truck exposed to sun, rain, bird droppings, tree sap, road grime, and whatever else nature decides to throw at it. Without regular cleaning and maintenance, even a $1,000 hard cover will start looking rough within a year. The good news: keeping a tonneau cover in top shape is straightforward and takes about 30 minutes every few weeks.
I’ve talked to tonneau cover owners who babied their covers religiously and ones who ignored maintenance entirely. The difference after two years is dramatic — the maintained cover still looks close to new, while the neglected one has faded vinyl, cracked seals, and stiff hinges that fight every fold. A small investment of time prevents a much larger investment in replacement parts or a whole new cover.
Products are available — click below to view them!
SEE DETAILSWash your tonneau cover every 2–4 weeks with mild soap and water. Apply UV protectant to vinyl or fabric covers every 3 months. Lubricate hinges, seals, and latches with silicone spray every 6 months. Inspect weather seals and drainage channels at least twice a year — once before winter and once in spring. That’s the entire routine, and it’ll add years to your cover’s life.
Soft covers — whether roll-up, snap-on, or soft tri-fold — are typically made from vinyl, canvas, or woven synthetic fabrics. These materials are durable but sensitive to harsh chemicals. Using the wrong cleaner can strip protective coatings, accelerate UV damage, and cause premature cracking.
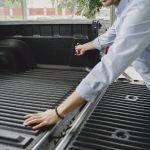
Start by rinsing the entire cover with a garden hose to remove loose dirt and debris. This step matters more than people realize — scrubbing dry dirt across vinyl creates micro-scratches that compound over time. Once the surface is wet, use a bucket of warm water mixed with a few drops of mild dish soap or a dedicated vinyl cleaner. Apply with a soft-bristle brush or microfiber cloth, working in sections from front to back.
Avoid pressure washers on soft covers. The concentrated spray can delaminate fabric layers, push water through seams, and damage stitching. A regular garden hose nozzle provides more than enough cleaning power. If you have stubborn stains from bird droppings or tree sap, soak the area with your cleaning solution for a few minutes before gently scrubbing — patience works better than pressure.
Rinse thoroughly after washing to prevent soap residue from drying on the surface — dried soap attracts dirt faster and can leave white streaks on dark vinyl. After the cover is clean and dry, apply a UV protectant spray designed for automotive vinyl or marine fabric. Products like 303 Aerospace Protectant or Marine Grade work well. These create a barrier against UV degradation, which is the primary cause of vinyl cracking and color fading. Apply every 8–12 weeks during summer, less frequently in winter or if the truck is garaged.
A pro tip from detailers I’ve spoken with: apply the UV protectant when the cover is clean but still slightly damp. The protectant bonds better to a slightly moist surface and spreads more evenly. Let it dry naturally in shade — direct sun can cause the protectant to streak or create uneven patches that show in certain lighting.
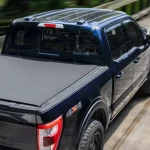
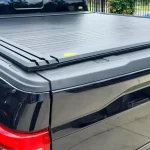
Hard covers have painted or powder-coated aluminum panels, fiberglass shells, or polycarbonate slats. The cleaning approach is closer to washing your truck’s body panels than treating fabric.
Wash hard covers with the same automotive car wash soap you’d use on the truck itself. A foam cannon or bucket wash with a microfiber wash mitt works perfectly. Pay extra attention to the hinge areas and the edges where panels meet — dirt and grit accumulate in these joints and can cause scratching when the cover folds or opens. Use a soft detailing brush or old toothbrush to clean tight hinge crevices where wash mitts can’t reach.
For painted or coated hard covers, consider applying automotive wax or sealant 2–3 times per year. This adds a hydrophobic layer that repels water and makes subsequent cleaning easier. It also protects against tree sap, bird droppings, and mineral deposits from hard water. Clay bar treatment works on hard tonneau covers just as well as on truck paint if you notice embedded contaminants that washing alone won’t remove.
Polycarbonate retractable covers (like Retrax) need special attention. Don’t use abrasive compounds, harsh solvents, or ammonia-based cleaners on polycarbonate — these cause clouding and micro-cracking. Stick to soap and water or a dedicated plastic cleaner. If the surface develops light scratches, a plastic polish designed for polycarbonate can restore clarity. These same polishes work on headlight restoration, so you may already have one in your garage.
Fiberglass covers can develop oxidation over time, similar to the gelcoat on a boat. If you notice a chalky or dull appearance, a marine-grade oxidation remover followed by wax will restore the finish. This is more labor-intensive than maintaining aluminum or polycarbonate covers, but fiberglass rewards the effort with a deep, glossy appearance that other materials can’t quite match.
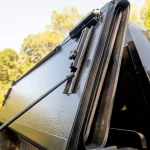
The rubber seals around your tonneau cover are what keep water out of the bed. When they dry out, crack, or lose compression, leaks follow. This is the single most common tonneau cover complaint I hear — and it’s almost always a maintenance issue rather than a product defect.
Every six months, wipe down all rubber seals with a damp cloth to remove accumulated dirt. Then apply a rubber conditioner or silicone-based seal treatment. Avoid petroleum-based products (like Armor All) on rubber seals — they provide a temporary shine but actually accelerate rubber degradation over time. Silicone-based products like Shin-Etsu or rubber-specific conditioners maintain elasticity without breaking down the material.
Check the seal compression by closing the cover and running a finger along each edge. If you can easily push a finger between the seal and the bed rail, the seal has lost compression and may need replacement. Most tonneau cover brands sell replacement seal kits for $20–$50 — far cheaper than buying a whole new cover. Replacing seals is a DIY job that takes about 30 minutes with adhesive-backed replacement strips available from the manufacturer or aftermarket suppliers.
Pay special attention to the seals at hinge points on folding covers. These seals flex with every fold and unfold cycle, making them wear faster than the static perimeter seals. If you notice leaking specifically at the hinge lines after heavy rain, these flex-point seals are usually the culprit. Replace them individually rather than waiting until the entire seal system needs attention.
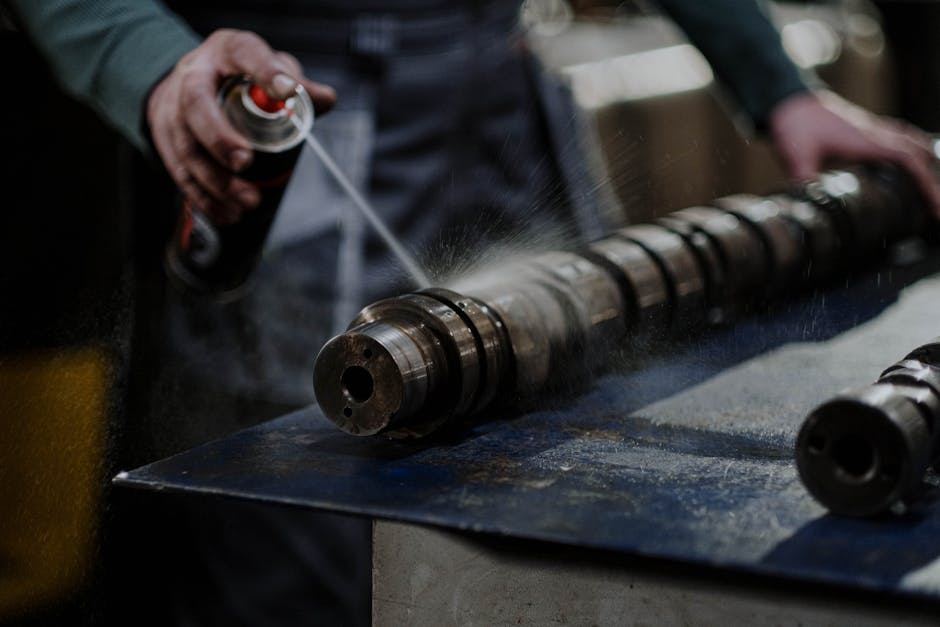
Hinges, latches, locking mechanisms, and rails all benefit from periodic lubrication. Dry metal-on-metal contact creates friction that wears components faster and makes operation stiff or noisy.
Use a dry silicone spray or white lithium grease on hinges and latch mechanisms every 6 months, or more frequently if you live in a dusty or coastal environment. Salt air is particularly aggressive on tonneau cover hardware — coastal truck owners should lubricate quarterly at minimum. When applying lubricant to hinges, open and close the cover several times to work the lubricant into the pivot points. Wipe away any excess that could drip onto the bed or cover surface.
For retractable covers with track rails, keep the rail channels clean and lightly lubricated. Dirt and debris in the tracks are the number one cause of retractable covers jamming or operating roughly. Blow the tracks out with compressed air, then apply the manufacturer’s recommended rail lubricant. Using the wrong type of grease can attract dust and make the problem worse — stick to the manufacturer’s recommendation or a dry PTFE-based lubricant that doesn’t attract particulates.
Latch mechanisms on folding covers deserve attention too. The spring-loaded latches that secure each panel can become stiff or fail to engage properly when dirty or dry. A quick spray of silicone lubricant into the latch mechanism keeps it snapping cleanly. If a latch starts requiring more force to engage, clean it thoroughly before assuming it needs replacement — most stiff latches are just dirty.
Before winter: Apply a fresh coat of UV protectant or wax. Check all seals for cracks before freezing temperatures make them brittle. Lubricate latches and hinges so they don’t seize in cold weather. If you’re in a heavy snow region, brush off snow accumulation regularly — soft covers can sag under heavy snow loads, stretching the fabric permanently. A soft-bristle push broom works well for clearing snow without scratching the cover surface.
After winter: Wash the cover thoroughly to remove road salt, which is corrosive to both vinyl and metal components. Inspect for any winter damage — cracked seals, loosened clamps, water stains inside the bed that indicate leak points. Re-lubricate everything that moves. This post-winter inspection is the most important maintenance session of the year, as cold weather stress and road chemicals do more damage in four months than the rest of the year combined.
Summer: UV is the biggest threat during summer months. Park in shade when possible, keep protectant applications on schedule, and check the cover surface for any signs of fading, chalking, or material degradation. Heat also causes thermal expansion in hard covers, which can temporarily affect panel alignment — this is normal and corrects itself as temperatures drop. If your hard cover seems difficult to latch during peak summer heat, don’t force it. Wait for cooler evening temperatures or park in shade for 30 minutes before attempting to close it.
Spring and fall: These transition seasons are ideal for your deep-cleaning sessions. The moderate temperatures make outdoor work pleasant, and you’re catching any damage from the preceding extreme season before it worsens. Spring cleaning catches winter salt damage. Fall cleaning prepares the cover for winter stress. Build these into your seasonal truck maintenance routine alongside tire rotations and fluid checks.
Using household cleaners: Bleach, ammonia-based glass cleaners, and abrasive kitchen cleaners can destroy tonneau cover materials. Stick to automotive-specific or mild soap products only. This includes “multi-purpose” cleaners that work fine on countertops but contain solvents that attack vinyl and rubber.
Ignoring drainage channels: Most hard covers have drain tubes that route water away from the bed. These tubes can clog with leaves, dirt, and debris. Check them during each cleaning session and flush with water to ensure they’re clear. A clogged drain tube causes water to back up and pool at the hinge joints, accelerating seal wear and potentially leaking into the bed.
Over-tightening clamps after cleaning: If you loosen the mounting clamps for cleaning access, retighten them to the manufacturer’s recommended torque — not tighter. Over-tightening warps bed rails on certain trucks and puts uneven stress on the cover frame.
Scrubbing aggressively on vinyl: Elbow grease doesn’t help with vinyl cleaning — it makes things worse. Hard scrubbing pushes dirt particles into the vinyl surface, creating scratches that trap more dirt. Let your cleaning solution do the work. Soak, wait, and wipe gently. Repeat if needed rather than scrubbing harder.
Neglecting the underside: The bottom surface of your tonneau cover — the side facing the bed — gets dirty too. Road grime kicks up from the bed, moisture can create mildew, and insects find the space appealing. Flip or remove the cover at least twice a year to clean the underside. A quick wipe-down prevents smell issues and catches moisture-related problems early.
Touchless car washes are generally safe for hard covers. Brush-type washes can damage soft covers and scratch hard cover finishes. The high-pressure rinse and chemical sprays in touchless washes handle most of the cleaning, but you’ll still need to hand-clean seals and hinges separately. If you use automatic washes regularly, inspect your cover’s seals more frequently — the chemicals used in commercial washes can accelerate seal degradation.
For vinyl or fabric covers, soak the sap spot with rubbing alcohol on a microfiber cloth, let it sit for 30 seconds, then gently wipe. For hard covers, use a dedicated automotive tar and sap remover. Don’t scrape with a razor or hard tool — you’ll damage the surface underneath. If the sap has been baked on by sun exposure, it may require multiple applications to fully remove.
Musty smell usually means moisture is trapped between the cover and the bed. Clean the underside of the cover and the bed rails with a mild soap solution, dry everything completely, and ensure all drainage channels are clear. If the smell persists, a light spray of white vinegar solution (50/50 with water) neutralizes mildew odor. Let it dry fully in direct sunlight before closing the cover. For persistent mildew, you may need to treat the cover with a marine-grade mildew remover and then apply a mildew-preventing protectant.
Once or twice a year, it’s worth removing the cover entirely to clean the bed rails and the underside of the cover. This is especially important for clamp-mounted covers, where debris accumulates between the clamp pads and the rail surface. It’s also a good time to check clamp condition, inspect rubber pads for wear, and re-tighten to spec.
Store the cover indoors in a clean, dry space. Lay it flat if possible — standing it on edge can stress hinges and warp soft panels. For soft covers, keep them loosely rolled rather than tightly folded to avoid permanent creases. Cover the storage area with a clean sheet or tarp to prevent dust accumulation. If storing for more than a month, apply UV protectant before storage to maintain the material condition.
Tonneau cover maintenance is about consistency, not intensity. A simple wash-and-protect routine every few weeks, combined with seal care and lubrication twice a year, prevents the gradual degradation that turns a solid cover into a replacement expense. Treat your cover with the same care you give the truck’s paint, and it’ll serve you well for years beyond the warranty period. The 30 minutes you invest each month will save you hundreds of dollars in premature replacement costs — and keep your truck looking sharp while it does its job.

")