Address
2949 Boundary Street
Jacksonville, FL 32202
Work Hours
Monday to Friday: 7AM - 7PM
Weekend: 10AM - 5PM
Address
2949 Boundary Street
Jacksonville, FL 32202
Work Hours
Monday to Friday: 7AM - 7PM
Weekend: 10AM - 5PM
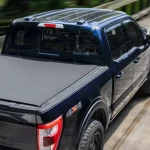
Installing a tonneau cover is one of the most satisfying truck DIY projects — it takes less than an hour, requires no drilling or permanent modifications, and immediately transforms your truck’s appearance and functionality. Whether you’re installing a soft roll-up, hard tri-fold, or retractable cover, the process follows a similar pattern: position, clamp, adjust, seal. This step-by-step guide walks you through each cover type so you can install with confidence.
I’ve installed tonneau covers on over a dozen trucks across all major cover types. The process gets faster with experience, but even a first-timer can achieve a professional-quality installation by following the manufacturer’s instructions and the tips in this guide. Take your time on the first install — rushing causes alignment issues that are harder to fix than prevent.
Products are available — click below to view them!
SEE DETAILSMost tonneau covers install in 15–45 minutes with basic hand tools (typically a socket wrench or hex key). No drilling is required. The process involves positioning the cover on the bed rails, attaching mounting clamps, adjusting for alignment and seal contact, and testing the latch and fold/roll/retract mechanism. A helper is useful for hard covers weighing over 40 pounds but not strictly necessary.
Regardless of cover type, complete these steps before touching the cover:
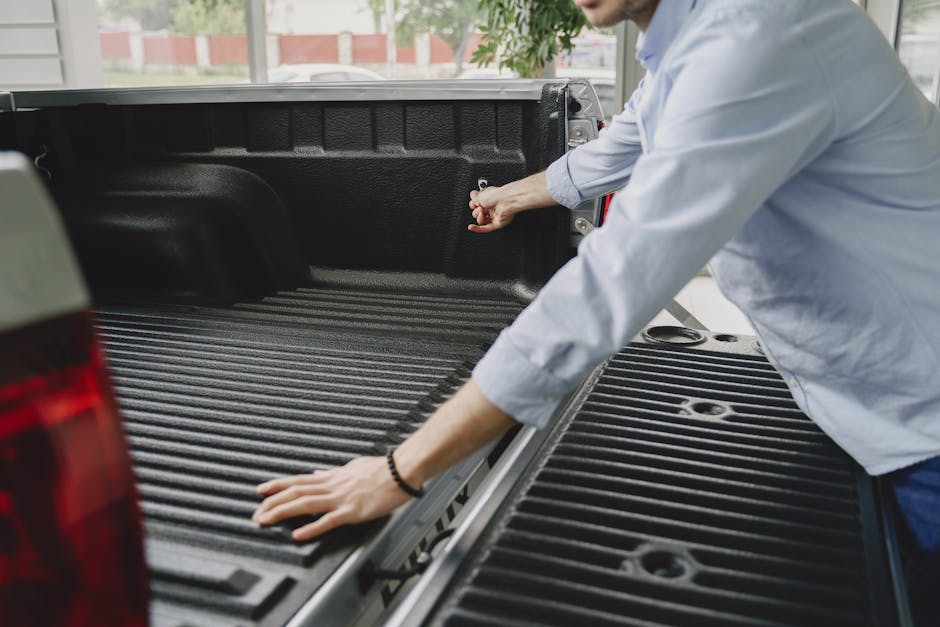
Clean the bed rails: Wipe down the entire length of both bed rails with a damp cloth to remove dirt, debris, and any residue from previous accessories. Clean rails ensure proper clamp grip and seal contact. If you have adhesive residue from old accessories, clean with isopropyl alcohol.
Lower the tailgate: Open the tailgate fully. You’ll need clear access to the rear rail area and the tailgate contact surface throughout the installation.
Read the instructions: Seriously. Every tonneau cover has truck-specific installation instructions. What works on an F-150 doesn’t necessarily work on a Tacoma. The clamp positions, torque specs, and adjustment procedures vary by truck. Spend five minutes reading the full guide before starting — it prevents the frustration of disassembling and redoing steps because you skipped ahead.
Gather tools: Most installations require a socket wrench (3/8″ or 1/2″ typically), a Phillips screwdriver, and possibly a hex/Allen key. Some covers include a dedicated installation tool. Check the instruction sheet for the specific tools needed.
Protective tape (optional but recommended): Apply painter’s tape or clear protective film to the bed rail surface where clamps will contact. This prevents cosmetic marks during and after installation.
Step 1 — Unbox and inventory: Lay out all components and verify against the parts list. You should have the cover assembly (usually pre-assembled with rails and fabric), mounting clamps (4–8 depending on model), rubber clamp pads, and hardware. Missing parts mean a call to the manufacturer before proceeding.
Step 2 — Position the cover: Place the rolled cover on the bed with the latch end toward the tailgate. Center it between the two bed rails. The frame should sit flat on the rails with even overhang on both sides. Don’t clamp anything yet — just position.
Step 3 — Attach front clamps: Secure the cab-end clamps first. These set the cover’s position relative to the bulkhead. Slide the clamps onto the rail at the positions indicated in the instructions, tighten lightly (hand-tight, not final torque), and check that the cover frame sits squarely against the front bulkhead seal.
Step 4 — Attach remaining clamps: Working toward the tailgate, attach each clamp at the specified positions. Tighten each one lightly — you’re setting position, not final torque. Ensure the cover frame sits evenly on both rails with consistent height on both sides.
Step 5 — Unroll and test: Unroll the cover toward the tailgate. The fabric should lie flat and reach the tailgate latch point cleanly. Check that the cover reaches the tailgate without being pulled tight or having excess slack. If the cover seems too short or too long to reach the tailgate comfortably, recheck that the cab-end clamps are in the correct position.
Step 6 — Latch the cover: Engage the tailgate latch. The latch should click securely without forcing. If the latch is difficult to engage, the cover tension is too high — slide the cab-end clamps slightly toward the tailgate. If the latch engages loosely with visible slack, slide the cab-end clamps toward the cab.
Step 7 — Adjust tension: Most soft covers have a tension adjustment — usually a tightening knob or bolt. Adjust until the cover surface is taut with no visible sag between crossbars. The surface should resist moderate hand pressure without deflecting more than a quarter-inch.
Step 8 — Final torque: Once alignment and tension are correct, tighten all clamps to their final torque. Don’t over-tighten — firm hand pressure plus a quarter-turn with a wrench is usually correct. Check that the cover still latches properly after final tightening.
Step 9 — Test: Open and close the cover several times. Roll it up, strap it, unroll it, latch it. Everything should operate smoothly. Check the seal contact around the entire perimeter by looking for gaps between the cover frame and the bed rail. Total time: 15–20 minutes.
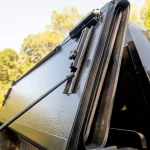
Step 1 — Unbox carefully: Hard covers are heavy (50–75 pounds). Have a helper if possible. Remove all protective film and shipping materials from the panels. Inventory all hardware.
Step 2 — Position the cover: With the cover fully folded (panels stacked), place it on the bed rails with the hinge end toward the cab. Center the cover between the rails. Don’t unfold the panels yet.
Step 3 — Attach front clamps: Secure the cab-end clamps to set the cover’s front position. The front panel should contact the bulkhead seal evenly across its width. Hand-tighten only.
Step 4 — Unfold panels: Carefully unfold each panel toward the tailgate, one at a time. As each panel lays flat, check that it sits evenly on both rails and that the hinge lines are centered over the bed.
Step 5 — Attach remaining clamps: Install the side rail clamps and tailgate-end clamps at the manufacturer’s specified positions. Hand-tighten each one. The cover should sit flat across all panels with consistent rail contact on both sides.
Step 6 — Check panel alignment: Close the cover and look at the hinge lines from the side. The gap between panels should be uniform along the full width. If one side is tighter than the other, the cover has shifted — adjust the clamps on the tight side to allow the panels to center.
Step 7 — Test latches: Engage the tailgate latch and any secondary locks. All latches should click securely without forcing. If a latch is difficult, the cover position needs slight adjustment rather than forcing the latch mechanism.
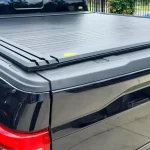
Step 8 — Final torque and seal check: Tighten all clamps to spec. Close the cover and check the perimeter seal contact — no visible gaps should exist between the seal and the rail. Fold and unfold the panels several times to verify smooth operation. Total time: 30–45 minutes.
Step 1 — Install the rail tracks: Rail tracks mount to the bed rail surface on both sides. Position each rail according to the instructions, drill pilot holes if required (some models), and bolt the rails down. Ensure the rails are parallel — measure the distance between rails at the front and rear of the bed. They should be identical.
Step 2 — Install the canister: Position the canister at the cab end of the bed between the rails. Bolt it to the rail mounting points. The canister must sit level and centered — use a level to verify. An off-center canister causes the cover to retract unevenly.
Step 3 — Feed the cover into the rails: Starting from the canister, extend the cover along the rail tracks toward the tailgate. The cover should slide smoothly in the tracks. If it binds or catches, check rail alignment.
Step 4 — Connect electrical (powered models): Route the wiring harness from the canister motor to the truck’s power source. Most powered models tap into an existing power lead under the bed or at the taillight wiring. Follow the electrical instructions precisely — incorrect wiring can damage the motor controller.
Step 5 — Test operation: Retract and extend the cover fully several times. It should move smoothly without catching, grinding, or hesitating. Test the lock at several positions along the track. For powered models, test the key fob from various distances and angles.
Step 6 — Adjust and seal: Check that the cover sits flush with the bed rails when closed. Adjust rail positions if necessary. Verify the tailgate seal contact. Total time: 45–60 minutes.
After any tonneau cover installation, complete these verification steps: drive the truck for 20–30 miles including highway speed, then recheck all clamp tightness — clamps settle during initial driving. Run a water test — close the cover and spray a garden hose over the surface for 3–5 minutes, then check the bed interior for any water entry. Verify that the tailgate opens and closes normally with the cover installed. Confirm that all bed accessories (tie-downs, lighting, steps) function properly.
The vast majority of modern tonneau covers use clamp-on mounting that requires no drilling. The clamps grip the bed rail edges and tighten with bolts or knobs. Some retractable cover rail systems require small pilot holes for secure mounting, but this is the exception rather than the rule. Check your specific cover’s installation requirements before purchasing if no-drill is important to you.
Soft covers (15–25 pounds) are easy solo installs. Hard folding covers (50–75 pounds) are possible solo but easier with a helper — someone to hold one end while you position the other. Retractable covers benefit significantly from a helper for the canister positioning. If installing alone, have the bed clear and tools organized before lifting the cover.
Follow the manufacturer’s torque specification if provided. If no spec is given, use hand-tight plus a quarter-turn with a wrench. The cover should not move when pushed with moderate hand pressure. Over-tightening can deform bed rails (especially aluminum) and damage clamp hardware. Under-tightening allows the cover to shift during driving, causing seal failure and friction wear.
First, verify the model year and bed length match exactly — the most common fit issue is ordering for the wrong generation. Second, check for aftermarket accessories that alter the bed rail profile — drop-in bed liners, rail caps, and cargo rails can prevent proper clamp seating. Third, contact the manufacturer’s support line with your truck details and photos of the fitment issue. Genuine manufacturing defects are rare but do occur and are covered under warranty.
Install the bed liner first. If using a spray-in liner, have the installer mask off the rail areas where tonneau cover clamps will sit — you want clean metal at the clamp contact points for proper grip. If using a drop-in liner, install it first and then check whether the tonneau cover clamps can accommodate the liner’s rail thickness. Some covers include spacer kits for drop-in liner compatibility.